Creating accessible documents in Microsoft Word
Microsoft Word is a popular application among individuals with a variety of disabilities, and is reasonably accessible. The text within Word documents can be read by assistive technologies such as screen readers and Braille devices. However, in order for Word documents to be fully accessible, authors must follow the main principles outlined in Creating Accessible Documents.
Accessibility: Full Check
Once you have done your best to make your document accessible, use Word's built in Accessibility Checker.
- Select the File menu.
- Select the Info Pane.
- Find Inspect Document.
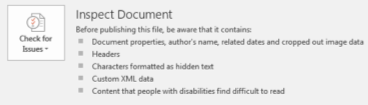
- Select Check for Issues.
- Select Check Accessibility.
- Your document opens and a new pane shows on the right side of the screen.
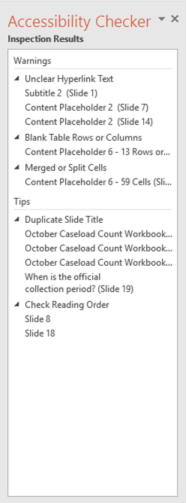
- You are obligated to fix all errors. The most common errors have been highlighted in this training. For further information, please visit the Microsoft Word page. on the WebAIM website.


Use titles
Document properties provides information that describe and identify a document, such as a title, author name, and subject.
To Add a Document Title:
- Click the File tab
- The Info screen here will show the basic document properties in a column on the right.
- Click Properties
- Choose the Summary tab
- Fill in the Document Title
Use headings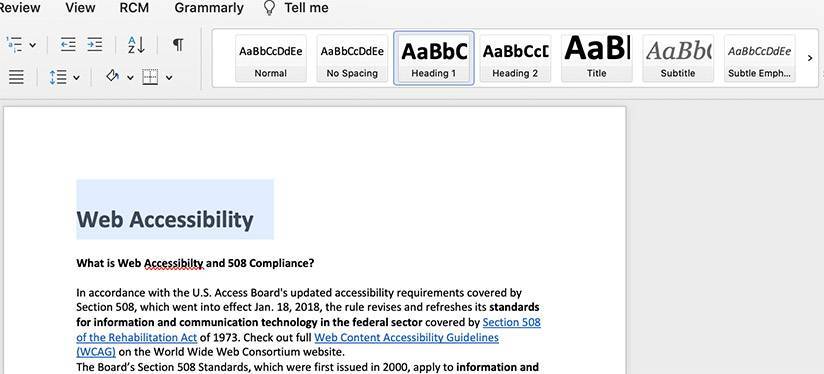

By using good heading structure, it helps people without proper eyesight to understand how the document is organized. Screen reader and Braille users can are able to jump between headings, which makes navigation much more efficient compared to not having headings at all.
Making text larger and bold does not make it a heading. In order to convert text to a heading in Microsoft Word, you must use the built-in Heading styles like “Heading 1” and “Heading 2”, available under Styles in the Home tab.
If you'd like to keep the formatting and size that you've already set-up. You can select the text that you'd like to set as a heading - and then right-click on the heading option and select, "Update Heading [level] to match selection". This will preserve the formatting you already have, and any remaining headings of that level will match. You can also right-click on the Heading in the menu after you've set them up and change the format/style for all of each level from the "Modify" menu command.
Visit Microsoft website for more information about creating Headers in Word.
Use lists
 Lists should be created using Word’s built-in tools for ordered (numbered) and unordered (bulleted) lists. Without using these tools, a list does not work properly, which makes the content more difficult for screen reader users to fully understand.
Use relevant hyperlinks
Include language in your document that conveys relevant information about the destination of the link, highlight that text and right click and select Hyperlink. Include the URL in the Address field and select OK.

Add alternative text for images
In most versions of Word, you can enter alternate text by right clicking an image and selecting Format Picture. Within the Format Picture dialog, select Alt Text and enter information in the Description field.

Identify document language
In Office, select Tools > Language from the application menu to define the default language. To define a different language for part of the document, select each foreign language individually, then select Tools > Language to define the language for each.
Export Word to PDF
Follow these steps to export your Word document to PDF.
- Run the Accessibility Checker
- Resolve every Error
- Select the File menu
- Navigate to the Export tab
- Select "Create PDF/XPS Document"
- Click on the "Create PDF/XPS" icon
- Choose the location in which you wish to save the file
- Make any changes to the name of the file in the File Name box
- Select the Save button to complete the process.
Note: Following these steps will not guarantee an accessible PDF document but will significantly decrease the number of potential problems.
Updated: 09/30/2022 04:33PM